Java LayoutManagers
The LayoutManagers are used to arrange components in a particular manner. LayoutManager is an interface that is implemented by all the classes of layout managers. There are following classes that represents the layout managers:
- java.awt.BorderLayout
- java.awt.FlowLayout
- java.awt.GridLayout
- java.awt.CardLayout
- java.awt.GridBagLayout
- javax.swing.BoxLayout
- javax.swing.GroupLayout
- javax.swing.ScrollPaneLayout
- javax.swing.SpringLayout etc.
Java BorderLayout
The BorderLayout is used to arrange the components in five regions: north, south, east, west and center. Each region (area) may contain one component only. It is the default layout of frame or window. The BorderLayout provides five constants for each region:
- public static final int NORTH
- public static final int SOUTH
- public static final int EAST
- public static final int WEST
- public static final int CENTER
Constructors of BorderLayout class:
- BorderLayout(): creates a border layout but with no gaps between the components.
- JBorderLayout(int hgap, int vgap): creates a border layout with the given horizontal and vertical gaps between the components.
Java GridLayout
The GridLayout is used to arrange the components in rectangular grid. One component is displayed in each rectangle.
Constructors of GridLayout class
- GridLayout(): creates a grid layout with one column per component in a row.
- GridLayout(int rows, int columns): creates a grid layout with the given rows and columns but no gaps between the components.
- GridLayout(int rows, int columns, int hgap, int vgap): creates a grid layout with the given rows and columns alongwith given horizontal and vertical gaps.
Example of GridLayout class

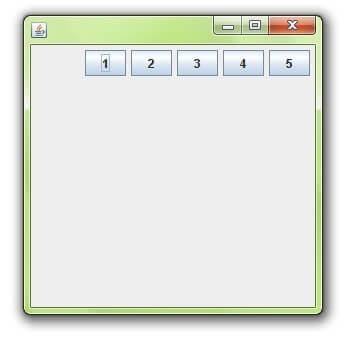
Java FlowLayout
The FlowLayout is used to arrange the components in a line, one after another (in a flow). It is the default layout of applet or panel.
Fields of FlowLayout class
- public static final int LEFT
- public static final int RIGHT
- public static final int CENTER
- public static final int LEADING
- public static final int TRAILING
Constructors of FlowLayout class
- FlowLayout(): creates a flow layout with centered alignment and a default 5 unit horizontal and vertical gap.
- FlowLayout(int align): creates a flow layout with the given alignment and a default 5 unit horizontal and vertical gap.
- FlowLayout(int align, int hgap, int vgap): creates a flow layout with the given alignment and the given horizontal and vertical gap.
Example of FlowLayout class
Java BoxLayout
The BoxLayout is used to arrange the components either vertically or horizontally. For this purpose, BoxLayout provides four constants. They are as follows:
Note: BoxLayout class is found in javax.swing package.
Fields of BoxLayout class
- public static final int X_AXIS
- public static final int Y_AXIS
- public static final int LINE_AXIS
- public static final int PAGE_AXIS
Constructor of BoxLayout class
- BoxLayout(Container c, int axis): creates a box layout that arranges the components with the given axis.
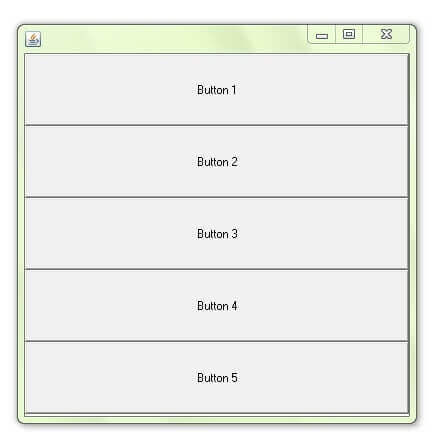
Example of BoxLayout class with Y-AXIS:
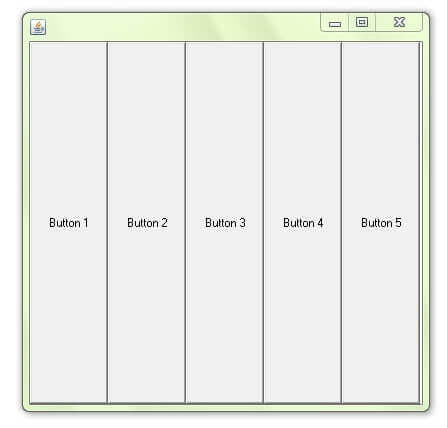
Example of BoxLayout class with X-AXIS
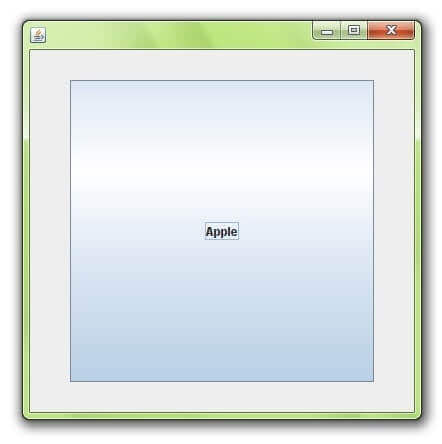
Java CardLayout
The CardLayout class manages the components in such a manner that only one component is visible at a time. It treats each component as a card that is why it is known as CardLayout.
Constructors of CardLayout class
- CardLayout(): creates a card layout with zero horizontal and vertical gap.
- CardLayout(int hgap, int vgap): creates a card layout with the given horizontal and vertical gap.
Commonly used methods of CardLayout class
- public void next(Container parent): is used to flip to the next card of the given container.
- public void previous(Container parent): is used to flip to the previous card of the given container.
- public void first(Container parent): is used to flip to the first card of the given container.
- public void last(Container parent): is used to flip to the last card of the given container.
- public void show(Container parent, String name): is used to flip to the specified card with the given name.
Example of CardLayout class
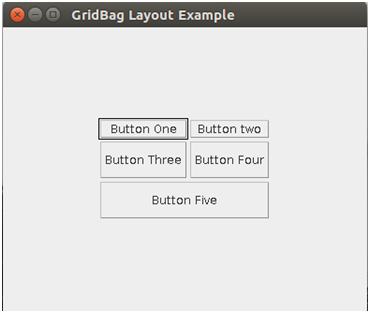
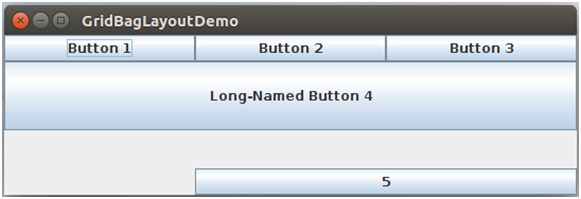
Java GridBagLayout
The Java GridBagLayout class is used to align components vertically, horizontally or along their baseline.
The components may not be of same size. Each GridBagLayout object maintains a dynamic, rectangular grid of cells. Each component occupies one or more cells known as its display area. Each component associates an instance of GridBagConstraints. With the help of constraints object we arrange component's display area on the grid. The GridBagLayout manages each component's minimum and preferred sizes in order to determine component's size.
Fields
| Modifier and Type | Field | Description |
|---|---|---|
| double[] | columnWeights | It is used to hold the overrides to the column weights. |
| int[] | columnWidths | It is used to hold the overrides to the column minimum width. |
| protected Hashtable<Component,GridBagConstraints> | comptable | It is used to maintains the association between a component and its gridbag constraints. |
| protected GridBagConstraints | defaultConstraints | It is used to hold a gridbag constraints instance containing the default values. |
| protected GridBagLayoutInfo | layoutInfo | It is used to hold the layout information for the gridbag. |
| protected static int | MAXGRIDSIZE | No longer in use just for backward compatibility |
| protected static int | MINSIZE | It is smallest grid that can be laid out by the grid bag layout. |
| protected static int | PREFERREDSIZE | It is preferred grid size that can be laid out by the grid bag layout. |
| int[] | rowHeights | It is used to hold the overrides to the row minimum heights. |
| double[] | rowWeights | It is used to hold the overrides to the row weights. |
Useful Methods
| Modifier and Type | Method | Description |
|---|---|---|
| void | addLayoutComponent(Component comp, Object constraints) | It adds specified component to the layout, using the specified constraints object. |
| void | addLayoutComponent(String name, Component comp) | It has no effect, since this layout manager does not use a per-component string. |
| protected void | adjustForGravity(GridBagConstraints constraints, Rectangle r) | It adjusts the x, y, width, and height fields to the correct values depending on the constraint geometry and pads. |
| protected void | AdjustForGravity(GridBagConstraints constraints, Rectangle r) | This method is for backwards compatibility only |
| protected void | arrangeGrid(Container parent) | Lays out the grid. |
| protected void | ArrangeGrid(Container parent) | This method is obsolete and supplied for backwards compatibility |
| GridBagConstraints | getConstraints(Component comp) | It is for getting the constraints for the specified component. |
| float | getLayoutAlignmentX(Container parent) | It returns the alignment along the x axis. |
| float | getLayoutAlignmentY(Container parent) | It returns the alignment along the y axis. |
| int[][] | getLayoutDimensions() | It determines column widths and row heights for the layout grid. |
| protected GridBagLayoutInfo | getLayoutInfo(Container parent, int sizeflag) | This method is obsolete and supplied for backwards compatibility. |
| protected GridBagLayoutInfo | GetLayoutInfo(Container parent, int sizeflag) | This method is obsolete and supplied for backwards compatibility. |
| Point | getLayoutOrigin() | It determines the origin of the layout area, in the graphics coordinate space of the target container. |
| double[][] | getLayoutWeights() | It determines the weights of the layout grid's columns and rows. |
| protected Dimension | getMinSize(Container parent, GridBagLayoutInfo info) | It figures out the minimum size of the master based on the information from getLayoutInfo. |
| protected Dimension | GetMinSize(Container parent, GridBagLayoutInfo info) | This method is obsolete and supplied for backwards compatibility only |
Example
Output:
Example 2
Output:
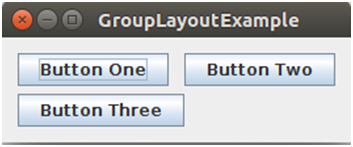
GroupLayout
GroupLayout groups its components and places them in a Container hierarchically. The grouping is done by instances of the Group class.
Group is an abstract class and two concrete classes which implement this Group class are SequentialGroup and ParallelGroup.
SequentialGroup positions its child sequentially one after another where as ParallelGroup aligns its child on top of each other.
The GroupLayout class provides methods such as createParallelGroup() and createSequentialGroup() to create groups.
GroupLayout treats each axis independently. That is, there is a group representing the horizontal axis, and a group representing the vertical axis. Each component must exists in both a horizontal and vertical group, otherwise an IllegalStateException is thrown during layout, or when the minimum, preferred or maximum size is requested.
Nested Classes
| Modifier and Type | Class | Description |
|---|---|---|
| static class | GroupLayout.Alignment | Enumeration of the possible ways ParallelGroup can align its children. |
| class | GroupLayout.Group | Group provides the basis for the two types of operations supported by GroupLayout: laying out components one after another (SequentialGroup) or aligned (ParallelGroup). |
| class | GroupLayout.ParallelGroup | It is a Group that aligns and sizes it's children. |
| class | GroupLayout.SequentialGroup | It is a Group that positions and sizes its elements sequentially, one after another. |
Fields
| Modifier and Type | Field | Description |
|---|---|---|
| static int | DEFAULT_SIZE | It indicates the size from the component or gap should be used for a particular range value. |
| static int | PREFERRED_SIZE | It indicates the preferred size from the component or gap should be used for a particular range value. |
Constructors
| GroupLayout(Container host) | It creates a GroupLayout for the specified Container. |
Useful Methods
| Modifier and Type | Field | Description |
|---|---|---|
| void | addLayoutComponent(Component component, Object constraints) | It notify that a Component has been added to the parent container. |
| void | addLayoutComponent(String name, Component component) | It notify that a Component has been added to the parent container. |
| GroupLayout.ParallelGroup | createBaselineGroup(boolean resizable, boolean anchorBaselineToTop) | It creates and returns a ParallelGroup that aligns it's elements along the baseline. |
| GroupLayout.ParallelGroup | createParallelGroup() | It creates and returns a ParallelGroup with an alignment of Alignment.LEADING |
| GroupLayout.ParallelGroup | createParallelGroup(GroupLayout.Alignment alignment) | It creates and returns a ParallelGroup with the specified alignment. |
| GroupLayout.ParallelGroup | createParallelGroup(GroupLayout.Alignment alignment, boolean resizable) | It creates and returns a ParallelGroup with the specified alignment and resize behavior. |
| GroupLayout.SequentialGroup | createSequentialGroup() | It creates and returns a SequentialGroup. |
| boolean | getAutoCreateContainerGaps() | It returns true if gaps between the container and components that border the container are automatically created. |
| boolean | getAutoCreateGaps() | It returns true if gaps between components are automatically created. |
| boolean | getHonorsVisibility() | It returns whether component visiblity is considered when sizing and positioning components. |
| float | getLayoutAlignmentX(Container parent) | It returns the alignment along the x axis. |
| float | getLayoutAlignmentY(Container parent) | It returns the alignment along the y axis. |
| Dimension | maximumLayoutSize(Container parent) | It returns the maximum size for the specified container. |
Example
Output:

Example 2
Output:
Java SpringLayout
A SpringLayout arranges the children of its associated container according to a set of constraints.Constraints are nothing but horizontal and vertical distance between two component edges. Every constrains are represented by a SpringLayout.Constraint object.
Each child of a SpringLayout container, as well as the container itself, has exactly one set of constraints associated with them.
Each edge position is dependent on the position of the other edge. If a constraint is added to create new edge than the previous binding is discarded. SpringLayout doesn't automatically set the location of the components it manages.
Nested Classes
| Modifier and Type | Class | Description |
|---|---|---|
| static class | SpringLayout.Constraints | It is a Constraints object helps to govern component's size and position change in a container that is controlled by SpringLayout |
Fields
| Modifier and Type | Field | Description |
|---|---|---|
| static String | BASELINE | It specifies the baseline of a component. |
| static String | EAST | It specifies the right edge of a component's bounding rectangle. |
| static String | HEIGHT | It specifies the height of a component's bounding rectangle. |
| static String | HORIZONTAL_CENTER | It specifies the horizontal center of a component's bounding rectangle. |
| static String | NORTH | It specifies the top edge of a component's bounding rectangle. |
| static String | SOUTH | It specifies the bottom edge of a component's bounding rectangle. |
| static String | VERTICAL_CENTER | It specifies the vertical center of a component's bounding rectangle. |
| static String | WEST | It specifies the left edge of a component's bounding rectangle. |
| static String | WIDTH | It specifies the width of a component's bounding rectangle. |
Useful Methods
| Modifier and Type | Method | Description |
|---|---|---|
| void | addLayoutComponent(Component component, Object constraints) | If constraints is an instance of SpringLayout. Constraints, associates the constraints with the specified component. |
| void | addLayoutComponent(String name, Component c) | Has no effect, since this layout manager does not use a per-component string. |
| Spring | getConstraint(String edgeName, Component c) | It returns the spring controlling the distance between the specified edge of the component and the top or left edge of its parent. |
| SpringLayout.Constraints | getConstraints(Component c) | It returns the constraints for the specified component. |
| float | getLayoutAlignmentX(Container p) | It returns 0.5f (centered). |
| float | getLayoutAlignmentY(Container p) | It returns 0.5f (centered). |
| void | invalidateLayout(Container p) | It Invalidates the layout, indicating that if the layout manager has cached information it should be discarded. |
| void | layoutContainer(Container parent) | It lays out the specified container. |
| Dimension | maximumLayoutSize(Container parent) | It is used to calculates the maximum size dimensions for the specified container, given the components it contains. |
| Dimension | minimumLayoutSize(Container parent) | It is used to calculates the minimum size dimensions for the specified container, given the components it contains. |
| Dimension | preferredLayoutSize(Container parent) | It is used to calculates the preferred size dimensions for the specified container, given the components it contains. |
Example
Output:

ScrollPaneLayout
The layout manager used by JScrollPane. JScrollPaneLayout is responsible for nine components: a viewport, two scrollbars, a row header, a column header, and four "corner" components.
Nested Class
| Modifier and Type | Class | Description |
|---|---|---|
| static class | ScrollPaneLayout.UIResource | It is UI resource version of ScrollPaneLayout. |
Field
| Modifier and Type | Field | Description |
|---|---|---|
| protected JViewport | colHead | It is column header child. |
| protected JScrollBar | hsb | It is scrollpane's horizontal scrollbar child. |
| protected int | hsbPolicy | It displays policy for the horizontal scrollbar. |
| protected Component | lowerLeft | This displays the lower left corner. |
| protected Component | lowerRight | This displays in the lower right corner. |
| protected JViewport | rowHead | It is row header child. |
| protected Component | upperLeft | This component displays in the upper left corner. |
| protected Component | upperRight | This component displays in the upper right corner. |
| protected JViewport | viewport | It is scrollpane's viewport child. |
| protected JScrollBar | vsb | It is scrollpane's vertical scrollbar child. |
| protected int | vsbPolicy | It is the display policy for the vertical scrollbar. |
Useful methods
| Modifier and Type | Method | Description |
|---|---|---|
| void | addLayoutComponent(String s, Component c) | It adds the specified component to the layout. |
| protected Component | addSingletonComponent(Component oldC, Component newC) | It removes an existing component. |
| JViewport | getColumnHeader() | It returns the JViewport object that is the column header. |
| Component | getCorner(String key) | It returns the Component at the specified corner. |
| JScrollBar | getHorizontalScrollBar() | It returns the JScrollBar object that handles horizontal scrolling. |
| int | getHorizontalScrollBarPolicy() | It returns the horizontal scrollbar-display policy. |
| JViewport | getRowHeader() | It returns the JViewport object that is the row header. |
| JScrollBar | getVerticalScrollBar() | It returns the JScrollBar object that handles vertical scrolling. |
| int | getVerticalScrollBarPolicy() | It returns the vertical scrollbar-display policy. |
| JViewport | getViewport() | It returns the JViewport object that displays the scrollable contents. |
Example:
Output:

Comments
Post a Comment