JAVA AWT

Java AWT Tutorial

Java AWT (Abstract Window Toolkit) is an API to develop GUI or window-based applications in java.

Java AWT components are platform-dependent i.e. components are displayed according to the view of operating system. AWT is heavyweight i.e. its components are using the resources of OS.

The java.awt package provides classes for AWT api such as TextFieldLabelTextArea, RadioButton, CheckBoxChoiceList etc.


Java AWT Hierarchy

The hierarchy of Java AWT classes are given below.
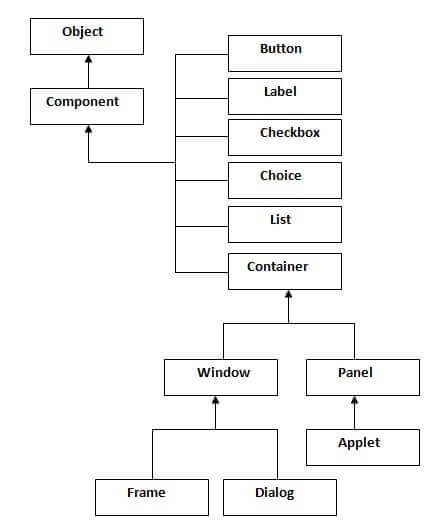
hierarchy of awt

Container

The Container is a component in AWT that can contain another components like buttons, textfields, labels etc. The classes that extends Container class are known as container such as Frame, Dialog and Panel.


Window

The window is the container that have no borders and menu bars. You must use frame, dialog or another window for creating a window.


Panel

The Panel is the container that doesn't contain title bar and menu bars. It can have other components like button, textfield etc.


Frame

The Frame is the container that contain title bar and can have menu bars. It can have other components like button, textfield etc.


Useful Methods of Component class

MethodDescription
public void add(Component c)inserts a component on this component.
public void setSize(int width,int height)sets the size (width and height) of the component.
public void setLayout(LayoutManager m)defines the layout manager for the component.
public void setVisible(boolean status)changes the visibility of the component, by default false.

Java AWT Example

To create simple awt example, you need a frame. There are two ways to create a frame in AWT.

  • By extending Frame class (inheritance)
  • By creating the object of Frame class (association)

AWT Example by Inheritance

Let's see a simple example of AWT where we are inheriting Frame class. Here, we are showing Button component on the Frame.

  1. import java.awt.*;  
  2. class First extends Frame{  
  3. First(){  
  4. Button b=new Button("click me");  
  5. b.setBounds(30,100,80,30);// setting button position  
  6. add(b);//adding button into frame  
  7. setSize(300,300);//frame size 300 width and 300 height  
  8. setLayout(null);//no layout manager  
  9. setVisible(true);//now frame will be visible, by default not visible  
  10. }  
  11. public static void main(String args[]){  
  12. First f=new First();  
  13. }}  

The setBounds(int xaxis, int yaxis, int width, int height) method is used in the above example that sets the position of the awt button.
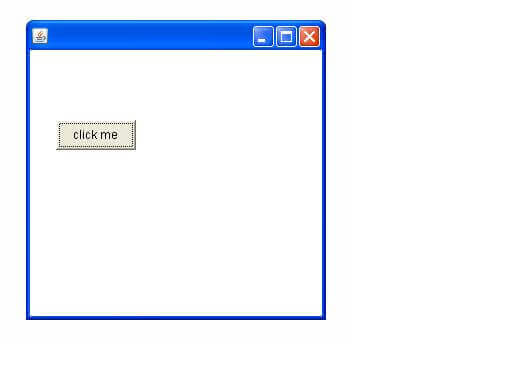
awt example

AWT Example by Association

Let's see a simple example of AWT where we are creating instance of Frame class. Here, we are showing Button component on the Frame.

  1. import java.awt.*;  
  2. class First2{  
  3. First2(){  
  4. Frame f=new Frame();  
  5. Button b=new Button("click me");  
  6. b.setBounds(30,50,80,30);  
  7. f.add(b);  
  8. f.setSize(300,300);  
  9. f.setLayout(null);  
  10. f.setVisible(true);  
  11. }  
  12. public static void main(String args[]){  
  13. First2 f=new First2();  
  14. }}  
awt example
Anurag Rana

Comments

Popular posts from this blog

JAVA Scrollbar, MenuItem and Menu, PopupMenu

ava AWT Scrollbar The  object  of Scrollbar class is used to add horizontal and vertical scrollbar. Scrollbar is a  GUI  component allows us to see invisible number of rows and columns. AWT Scrollbar class declaration public   class  Scrollbar  extends  Component  implements  Adjustable, Accessible   Java AWT Scrollbar Example import  java.awt.*;   class  ScrollbarExample{   ScrollbarExample(){               Frame f=  new  Frame( "Scrollbar Example" );               Scrollbar s= new  Scrollbar();               s.setBounds( 100 , 100 ,  50 , 100 );               f.add(s);               f.setSize( 400 , 400 );               f.setLayout( null );               f.setVisible( true );   }   public   static   void  main(String args[]){           new  ScrollbarExample();   }   }   Output: Java AWT Scrollbar Example with AdjustmentListener import  java.awt.*;   import  java.awt.event.*;   class  ScrollbarExample{        ScrollbarExample(){               Frame f=  new  Frame( "Scro

Difference between net platform and dot net framework...

Difference between net platform and dot net framework... .net platform supports programming languages that are .net compatible. It is the platform using which we can build and develop the applications. .net framework is the engine inside the .net platform which actually compiles and produces the executable code. .net framework contains CLR(Common Language Runtime) and FCL(Framework Class Library) using which it produces the platform independent codes. What is the .NET Framework? The Microsoft .NET Framework is a platform for building, deploying, and running Web Services and applications. It provides a highly productive, standards-based, multi-language environment for integrating existing investments with next-generation applications and services as well as the agility to solve the challenges of deployment and operation of Internet-scale applications. The .NET Framework consists of three main parts: the common language runtime, a hierarchical set of unified class librari

C++ this Pointer, static, struct and Enumeration

C++ this Pointer In C++ programming,  this  is a keyword that refers to the current instance of the class. There can be 3 main usage of this keyword in C++. It can be used  to pass current object as a parameter to another method. It can be used  to refer current class instance variable. It can be used  to declare indexers. C++ this Pointer Example Let's see the example of this keyword in C++ that refers to the fields of current class. #include <iostream>    using   namespace  std;   class  Employee {       public :           int  id;  //data member (also instance variable)               string name;  //data member(also instance variable)            float  salary;          Employee( int  id, string name,  float  salary)             {                   this ->id = id;                  this ->name = name;                  this ->salary = salary;            }             void  display()             {                 cout<<id<< "  " <<name<&