Java ActionListener Interface
The Java ActionListener is notified whenever you click on the button or menu item. It is notified against ActionEvent. The ActionListener interface is found in java.awt.event package. It has only one method: actionPerformed().
actionPerformed() method
The actionPerformed() method is invoked automatically whenever you click on the registered component.
- public abstract void actionPerformed(ActionEvent e);
How to write ActionListener
The common approach is to implement the ActionListener. If you implement the ActionListener class, you need to follow 3 steps:
1) Implement the ActionListener interface in the class:
- public class ActionListenerExample Implements ActionListener
2) Register the component with the Listener:
- component.addActionListener(instanceOfListenerclass);
3) Override the actionPerformed() method:
- public void actionPerformed(ActionEvent e){
-
- }
Java ActionListener Example: On Button click
- import java.awt.*;
- import java.awt.event.*;
-
- public class ActionListenerExample implements ActionListener{
- public static void main(String[] args) {
- Frame f=new Frame("ActionListener Example");
- final TextField tf=new TextField();
- tf.setBounds(50,50, 150,20);
- Button b=new Button("Click Here");
- b.setBounds(50,100,60,30);
-
- b.addActionListener(this);
- f.add(b);f.add(tf);
- f.setSize(400,400);
- f.setLayout(null);
- f.setVisible(true);
- }
-
- public void actionPerformed(ActionEvent e){
- tf.setText("Welcome to Javatpoint.");
- }
- }
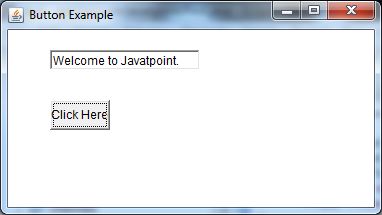
output:
Java ActionListener Example: Using Anonymous class
We can also use the anonymous class to implement the ActionListener. It is the shorthand way, so you do not need to follow the 3 steps:
- b.addActionListener(new ActionListener(){
- public void actionPerformed(ActionEvent e){
- tf.setText("Welcome to Javatpoint.");
- }
- });
Let us see the full code of ActionListener using anonymous class.
- import java.awt.*;
- import java.awt.event.*;
- public class ActionListenerExample {
- public static void main(String[] args) {
- Frame f=new Frame("ActionListener Example");
- final TextField tf=new TextField();
- tf.setBounds(50,50, 150,20);
- Button b=new Button("Click Here");
- b.setBounds(50,100,60,30);
-
- b.addActionListener(new ActionListener(){
- public void actionPerformed(ActionEvent e){
- tf.setText("Welcome to Javatpoint.");
- }
- });
- f.add(b);f.add(tf);
- f.setSize(400,400);
- f.setLayout(null);
- f.setVisible(true);
- }
- }
Output:
Anurag Rana
Educator CSE/IT
Comments
Post a Comment