
Java Database Connectivity

Java Database Connectivity with 5 Steps

There are 5 steps to connect any java application with the database using JDBC. These steps are as follows:
  • Register the Driver class
  • Create connection
  • Create statement
  • Execute queries
  • Close connection
Java Database Connectivity Steps

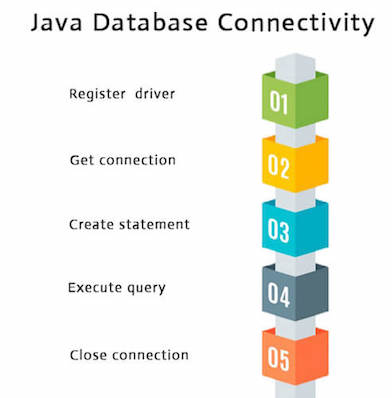
1) Register the driver class

The forName() method of Class class is used to register the driver class. This method is used to dynamically load the driver class.

Syntax of forName() method

  1. public static void forName(String className)throws ClassNotFoundException  

Example to register the OracleDriver class

Here, Java program is loading oracle driver to esteblish database connection.

  1. Class.forName("oracle.jdbc.driver.OracleDriver");  

2) Create the connection object

The getConnection() method of DriverManager class is used to establish connection with the database.

Syntax of getConnection() method

  1. 1public static Connection getConnection(String url)throws SQLException  
  2. 2public static Connection getConnection(String url,String name,String password)  
  3. throws SQLException  

Example to establish connection with the Oracle database

  1. Connection con=DriverManager.getConnection(  
  2. "jdbc:oracle:thin:@localhost:1521:xe","system","password");  

3) Create the Statement object

The createStatement() method of Connection interface is used to create statement. The object of statement is responsible to execute queries with the database.

Syntax of createStatement() method

  1. public Statement createStatement()throws SQLException  

Example to create the statement object

  1. Statement stmt=con.createStatement();  

4) Execute the query

The executeQuery() method of Statement interface is used to execute queries to the database. This method returns the object of ResultSet that can be used to get all the records of a table.

Syntax of executeQuery() method

  1. public ResultSet executeQuery(String sql)throws SQLException  

Example to execute query

  1. ResultSet rs=stmt.executeQuery("select * from emp");  
  2.   
  3. while(rs.next()){  
  4. System.out.println(rs.getInt(1)+" "+rs.getString(2));  
  5. }  

5) Close the connection object

By closing connection object statement and ResultSet will be closed automatically. The close() method of Connection interface is used to close the connection.

Syntax of close() method

  1. public void close()throws SQLException  

Example to close connection

  1. con.close();  

Java Database Connectivity with Oracle

To connect java application with the oracle database, we need to follow 5 following steps. In this example, we are using Oracle 10g as the database. So we need to know following information for the oracle database:
  1. Driver class: The driver class for the oracle database is oracle.jdbc.driver.OracleDriver.
  2. Connection URL: The connection URL for the oracle10G database is jdbc:oracle:thin:@localhost:1521:xe where jdbc is the API, oracle is the database, thin is the driver, localhost is the server name on which oracle is running, we may also use IP address, 1521 is the port number and XE is the Oracle service name. You may get all these information from the tnsnames.ora file.
  3. Username: The default username for the oracle database is system.
  4. Password: It is the password given by the user at the time of installing the oracle database.

Create a Table

Before establishing connection, let's first create a table in oracle database. Following is the SQL query to create a table.
  1. create table emp(id number(10),name varchar2(40),age number(3)); 

Example to Connect Java Application with Oracle database

In this example, we are connecting to an Oracle database and getting data from emp table. Here, system and oracle are the username and password of the Oracle database.

  1. import java.sql.*;  
  2. class OracleCon{  
  3. public static void main(String args[]){  
  4. try{  
  5. //step1 load the driver class  
  6. Class.forName("oracle.jdbc.driver.OracleDriver");  
  7.   
  8. //step2 create  the connection object  
  9. Connection con=DriverManager.getConnection(  
  10. "jdbc:oracle:thin:@localhost:1521:xe","system","oracle");  
  11.   
  12. //step3 create the statement object  
  13. Statement stmt=con.createStatement();  
  14.   
  15. //step4 execute query  
  16. ResultSet rs=stmt.executeQuery("select * from emp");  
  17. while(rs.next())  
  18. System.out.println(rs.getInt(1)+"  "+rs.getString(2)+"  "+rs.getString(3));  
  19.   
  20. //step5 close the connection object  
  21. con.close();  
  22.   
  23. }catch(Exception e){ System.out.println(e);}  
  24.   
  25. }  
  26. }  

To connect java application with the Oracle database ojdbc14.jar file is required to be loaded.

Two ways to load the jar file:

  1. paste the ojdbc14.jar file in jre/lib/ext folder
  2. set classpath

1) paste the ojdbc14.jar file in JRE/lib/ext folder:

Firstly, search the ojdbc14.jar file then go to JRE/lib/ext folder and paste the jar file here.

2) set classpath:

There are two ways to set the classpath:
  • temporary
  • permanent

How to set the temporary classpath:

Firstly, search the ojdbc14.jar file then open command prompt and write:
  1. C:>set classpath=c:\folder\ojdbc14.jar;.;  

How to set the permanent classpath:

Go to environment variable then click on new tab. In variable name write classpath and in variable value paste the path to ojdbc14.jar by appending ojdbc14.jar;.; as C:\oraclexe\app\oracle\product\10.2.0\server\jdbc\lib\ojdbc14.jar;.;

Java Database Connectivity with MySQL

To connect Java application with the MySQL database, we need to follow 5 following steps.

In this example we are using MySql as the database. So we need to know following informations for the mysql database:

  1. Driver class: The driver class for the mysql database is com.mysql.jdbc.Driver.
  2. Connection URL: The connection URL for the mysql database is jdbc:mysql://localhost:3306/sonoo where jdbc is the API, mysql is the database, localhost is the server name on which mysql is running, we may also use IP address, 3306 is the port number and sonoo is the database name. We may use any database, in such case, we need to replace the sonoo with our database name.
  3. Username: The default username for the mysql database is root.
  4. Password: It is the password given by the user at the time of installing the mysql database. In this example, we are going to use root as the password.

Let's first create a table in the mysql database, but before creating table, we need to create database first.

  1. create database sonoo;  
  2. use sonoo;  
  3. create table emp(id int(10),name varchar(40),age int(3));  

Example to Connect Java Application with mysql database

In this example, sonoo is the database name, root is the username and password both.

  1. import java.sql.*;  
  2. class MysqlCon{  
  3. public static void main(String args[]){  
  4. try{  
  5. Class.forName("com.mysql.jdbc.Driver");  
  6. Connection con=DriverManager.getConnection(  
  7. "jdbc:mysql://localhost:3306/sonoo","root","root");  
  8. //here sonoo is database name, root is username and password  
  9. Statement stmt=con.createStatement();  
  10. ResultSet rs=stmt.executeQuery("select * from emp");  
  11. while(rs.next())  
  12. System.out.println(rs.getInt(1)+"  "+rs.getString(2)+"  "+rs.getString(3));  
  13. con.close();  
  14. }catch(Exception e){ System.out.println(e);}  
  15. }  
  16. }  

The above example will fetch all the records of emp table.


To connect java application with the mysql database, mysqlconnector.jar file is required to be loaded.

Two ways to load the jar file:

  1. Paste the mysqlconnector.jar file in jre/lib/ext folder
  2. Set classpath

1) Paste the mysqlconnector.jar file in JRE/lib/ext folder:

Download the mysqlconnector.jar file. Go to jre/lib/ext folder and paste the jar file here.

2) Set classpath:

There are two ways to set the classpath:
  • temporary
  • permanent

How to set the temporary classpath

open command prompt and write:
  1. C:>set classpath=c:\folder\mysql-connector-java-5.0.8-bin.jar;.;  

How to set the permanent classpath

Go to environment variable then click on new tab. In variable name write classpath and in variable value paste the path to the mysqlconnector.jar file by appending mysqlconnector.jar;.; as C:\folder\mysql-connector-java-5.0.8-bin.jar;.;

Connectivity with Access without DSN

There are two ways to connect java application with the access database.

  1. Without DSN (Data Source Name)
  2. With DSN

Java is mostly used with Oracle, mysql, or DB2 database. So you can learn this topic only for knowledge.


Example to Connect Java Application with access without DSN

In this example, we are going to connect the java program with the access database. In such case, we have created the login table in the access database. There is only one column in the table named name. Let's get all the name of the login table.

  1. import java.sql.*;  
  2. class Test{  
  3. public static void main(String ar[]){  
  4.  try{  
  5.    String database="student.mdb";//Here database exists in the current directory  
  6.   
  7.    String url="jdbc:odbc:Driver={Microsoft Access Driver (*.mdb)};  
  8.                     DBQ=" + database + ";DriverID=22;READONLY=true";  
  9.   
  10.    Class.forName("sun.jdbc.odbc.JdbcOdbcDriver");  
  11.    Connection c=DriverManager.getConnection(url);  
  12.    Statement st=c.createStatement();  
  13.    ResultSet rs=st.executeQuery("select * from login");  
  14.     
  15.    while(rs.next()){  
  16.     System.out.println(rs.getString(1));  
  17.    }  
  18.   
  19. }catch(Exception ee){System.out.println(ee);}  
  20.   
  21. }}  


Example to Connect Java Application with access with DSN

Connectivity with type1 driver is not considered good. To connect java application with type1 driver, create DSN first, here we are assuming your dsn name is mydsn.

  1. import java.sql.*;  
  2. class Test{  
  3. public static void main(String ar[]){  
  4.  try{  
  5.    String url="jdbc:odbc:mydsn";  
  6.    Class.forName("sun.jdbc.odbc.JdbcOdbcDriver");  
  7.    Connection c=DriverManager.getConnection(url);  
  8.    Statement st=c.createStatement();  
  9.    ResultSet rs=st.executeQuery("select * from login");  
  10.     
  11.    while(rs.next()){  
  12.     System.out.println(rs.getString(1));  
  13.    }  
  14.   
  15. }catch(Exception ee){System.out.println(ee);}  
  16.   
  17. }}  


Anurag Rana Educator CSE/IT

Comments

Popular posts from this blog

JAVA Scrollbar, MenuItem and Menu, PopupMenu

ava AWT Scrollbar The  object  of Scrollbar class is used to add horizontal and vertical scrollbar. Scrollbar is a  GUI  component allows us to see invisible number of rows and columns. AWT Scrollbar class declaration public   class  Scrollbar  extends  Component  implements  Adjustable, Accessible   Java AWT Scrollbar Example import  java.awt.*;   class  ScrollbarExample{   ScrollbarExample(){               Frame f=  new  Frame( "Scrollbar Example" );               Scrollbar s= new  Scrollbar();               s.setBounds( 100 , 100 ,  50 , 100 );               f.add(s);               f.setSize( 400 , 400 );               f.setLayout( null );               f.setVisible( true );   }   public   static   void  main(String args[]){           new  ScrollbarExample();   }   }   Output: Java AWT Scrollbar Example with AdjustmentListener import  java.awt.*;   import  java.awt.event.*;   class  ScrollbarExample{        ScrollbarExample(){               Frame f=  new  Frame( "Scro

Difference between net platform and dot net framework...

Difference between net platform and dot net framework... .net platform supports programming languages that are .net compatible. It is the platform using which we can build and develop the applications. .net framework is the engine inside the .net platform which actually compiles and produces the executable code. .net framework contains CLR(Common Language Runtime) and FCL(Framework Class Library) using which it produces the platform independent codes. What is the .NET Framework? The Microsoft .NET Framework is a platform for building, deploying, and running Web Services and applications. It provides a highly productive, standards-based, multi-language environment for integrating existing investments with next-generation applications and services as well as the agility to solve the challenges of deployment and operation of Internet-scale applications. The .NET Framework consists of three main parts: the common language runtime, a hierarchical set of unified class librari

C++ this Pointer, static, struct and Enumeration

C++ this Pointer In C++ programming,  this  is a keyword that refers to the current instance of the class. There can be 3 main usage of this keyword in C++. It can be used  to pass current object as a parameter to another method. It can be used  to refer current class instance variable. It can be used  to declare indexers. C++ this Pointer Example Let's see the example of this keyword in C++ that refers to the fields of current class. #include <iostream>    using   namespace  std;   class  Employee {       public :           int  id;  //data member (also instance variable)               string name;  //data member(also instance variable)            float  salary;          Employee( int  id, string name,  float  salary)             {                   this ->id = id;                  this ->name = name;                  this ->salary = salary;            }             void  display()             {                 cout<<id<< "  " <<name<&