JSP technology is used to create web application just like Servlet technology. It can be thought of as an extension to Servlet because it provides more functionality than servlet such as expression language, JSTL, etc.
A JSP page consists of HTML tags and JSP tags. The JSP pages are easier to maintain than Servlet because we can separate designing and development. It provides some additional features such as Expression Language, Custom Tags, etc.
Advantages of JSP over Servlet
There are many advantages of JSP over the Servlet. They are as follows:
1) Extension to Servlet
JSP technology is the extension to Servlet technology. We can use all the features of the Servlet in JSP. In addition to, we can use implicit objects, predefined tags, expression language and Custom tags in JSP, that makes JSP development easy.
2) Easy to maintain
JSP can be easily managed because we can easily separate our business logic with presentation logic. In Servlet technology, we mix our business logic with the presentation logic.
3) Fast Development: No need to recompile and redeploy
If JSP page is modified, we don't need to recompile and redeploy the project. The Servlet code needs to be updated and recompiled if we have to change the look and feel of the application.
4) Less code than Servlet
In JSP, we can use many tags such as action tags, JSTL, custom tags, etc. that reduces the code. Moreover, we can use EL, implicit objects, etc.
The Lifecycle of a JSP Page
The JSP pages follow these phases:
- Translation of JSP Page
- Compilation of JSP Page
- Classloading (the classloader loads class file)
- Instantiation (Object of the Generated Servlet is created).
- Initialization ( the container invokes jspInit() method).
- Request processing ( the container invokes _jspService() method).
- Destroy ( the container invokes jspDestroy() method).
Note: jspInit(), _jspService() and jspDestroy() are the life cycle methods of JSP.
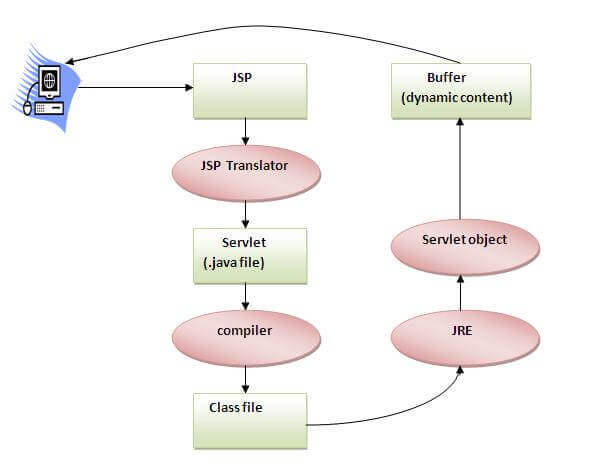
As depicted in the above diagram, JSP page is translated into Servlet by the help of JSP translator. The JSP translator is a part of the web server which is responsible for translating the JSP page into Servlet. After that, Servlet page is compiled by the compiler and gets converted into the class file. Moreover, all the processes that happen in Servlet are performed on JSP later like initialization, committing response to the browser and destroy.
Creating a simple JSP Page
To create the first JSP page, write some HTML code as given below, and save it by .jsp extension. We have saved this file as index.jsp. Put it in a folder and paste the folder in the web-apps directory in apache tomcat to run the JSP page.
index.jspLet's see the simple example of JSP where we are using the scriptlet tag to put Java code in the JSP page. We will learn scriptlet tag later.
It will print 10 on the browser.
How to run a simple JSP Page?
Follow the following steps to execute this JSP page:
- Start the server
- Put the JSP file in a folder and deploy on the server
- Visit the browser by the URL http://localhost:portno/contextRoot/jspfile, for example, http://localhost:8888/myapplication/index.jsp
Do I need to follow the directory structure to run a simple JSP?
No, there is no need of directory structure if you don't have class files or TLD files. For example, put JSP files in a folder directly and deploy that folder. It will be running fine. However, if you are using Bean class, Servlet or TLD file, the directory structure is required.
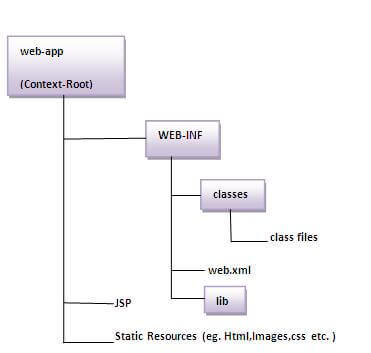
The Directory structure of JSP
The directory structure of JSP page is same as Servlet. We contain the JSP page outside the WEB-INF folder or in any directory.
The JSP API
javax.servlet.jspThe JSP API consists of two packages:
- javax.servlet.jsp.tagext
javax.servlet.jsp package
The javax.servlet.jsp package has two interfaces and classes.The two interfaces are as follows:
- JspPage
- HttpJspPage
The classes are as follows:
- JspWriter
- PageContext
- JspFactory
- JspEngineInfo
- JspException
- JspError
The JspPage interface
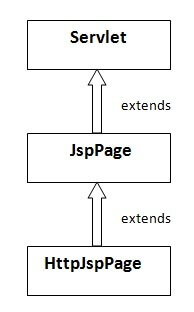
According to the JSP specification, all the generated servlet classes must implement the JspPage interface. It extends the Servlet interface. It provides two life cycle methods.
Methods of JspPage interface
- public void jspInit(): It is invoked only once during the life cycle of the JSP when JSP page is requested firstly. It is used to perform initialization. It is same as the init() method of Servlet interface.
- public void jspDestroy(): It is invoked only once during the life cycle of the JSP before the JSP page is destroyed. It can be used to perform some clean up operation.
The HttpJspPage interface
The HttpJspPage interface provides the one life cycle method of JSP. It extends the JspPage interface.
Method of HttpJspPage interface:
- public void _jspService(): It is invoked each time when request for the JSP page comes to the container. It is used to process the request. The underscore _ signifies that you cannot override this method.
Comments
Post a Comment